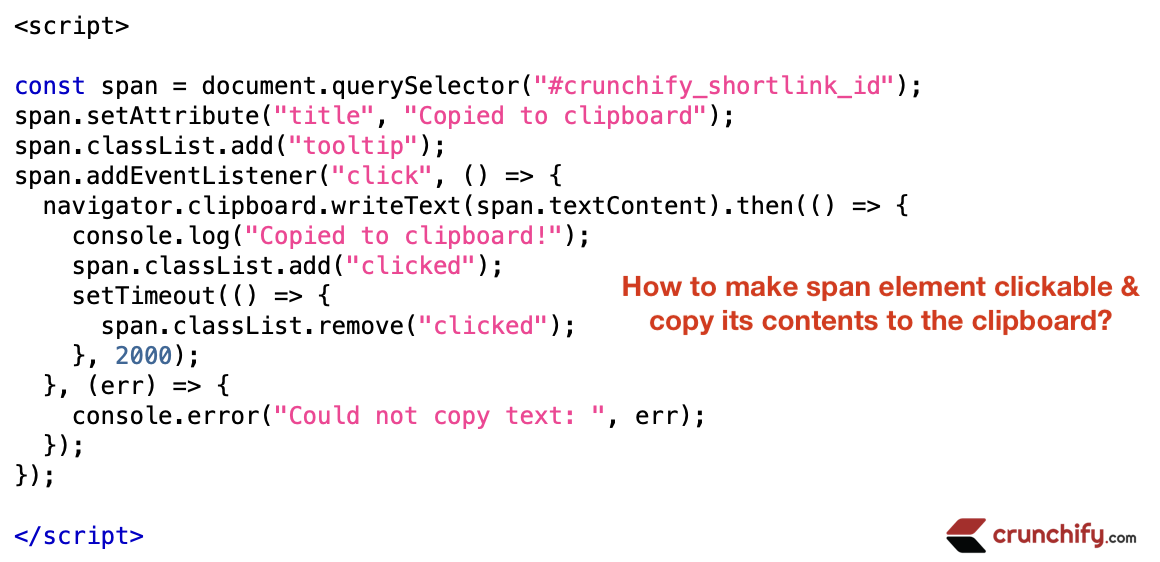
To make a span element clickable and copy its contents to the clipboard, you can use the following JavaScript code:
<script>

const span = document.querySelector("#crunchify_shortlink_id");
span.setAttribute("title", "Copied to clipboard");
span.classList.add("tooltip");
span.addEventListener("click", () => {
  navigator.clipboard.writeText(span.textContent).then(() => {
    console.log("Copied to clipboard!");
    span.classList.add("clicked");
    setTimeout(() => {
      span.classList.remove("clicked");
    }, 2000);
  }, (err) => {
    console.error("Could not copy text: ", err);
  });
});

</script>
This code uses the querySelector method to select the span element from the DOM, and attaches a click event listener to it. Inside the event listener, it uses the navigator.clipboard.writeText() method to write the text content of the span element to the clipboard.
Note that the navigator.clipboard.writeText() method is currently only supported in certain modern browsers and requires HTTPS.
To use querySelector to select a span element by its ID, you can use the # symbol followed by the ID of the element.
const span = document.querySelector("#my-span");
Here is a HTML Part:
Here is our HTML part which we have on Crunchify’s functions.php file.
'<span id="crunchify_shortlink_id" class="crunchify_shortlink hide-on-mobile"> <i class="fa-solid fa-link"></i> '.$bitly_url.' </span>'
Live Example:
You can see here on this post just after Title. Try clicking it.

To show a tooltip with the message “Copied to clipboard” after the text in a span element has been copied to the clipboard, you can add the following code inside the then() callback function of the navigator.clipboard.writeText() method:
span.setAttribute("title", "Copied to clipboard");
span.classList.add("tooltip");
This will set the title attribute of the span element to “Copied to clipboard”, and add the class “tooltip” to the element.
To display the tooltip, you need to add some CSS styles to your project or WordPress theme’s style.css file.
.tooltip {
  position: relative;
}

.tooltip::before {
  content: attr(title);
  position: absolute;
  top: -30px;
  left: 20;
  padding: 5px;
  background-color: #fff;
  color: #1a73e8;
  border-radius: 3px;
  font-size: 12px;
  visibility: hidden;
  opacity: 0;
  transition: visibility 0s, opacity 1s linear;
}

.tooltip.clicked::before {
  visibility: visible;
  opacity: 1;
  transition: opacity 0.5s linear;
}

.tooltip::before {
  opacity: 0;
}
This CSS will style the tooltip so that it appears above the span element when hovered over and disappears when not hovered.
To make the “Copied to clipboard” tooltip disappear after 2 seconds, you can use the setTimeout function to remove the clicked class from the span element after a certain amount of time has passed.
Here’s an example of how you can modify the JavaScript code to remove the clicked class from the span element after 2 seconds:
setTimeout(() => {
      span.classList.remove("clicked");
    }, 2000);
To add a fading effect to the “Copied to clipboard” tooltip when it disappears, you can use CSS transitions to gradually change the opacity of the tooltip from 1 to 0.
Here’s an example of how you can modify the CSS to add a fading effect to the tooltip when it disappears:
.tooltip::before {
  content: attr(title);
  position: absolute;
  top: -35px;
  left: 0;
  padding: 5px;
  background-color: #000;
  color: #fff;
  border-radius: 3px;
  font-size: 12px;
  visibility: hidden;
  opacity: 0;
  transition: visibility 0s, opacity 0.5s linear;
}

.tooltip.clicked::before {
  visibility: visible;
  opacity: 1;
  transition: opacity 2s linear;
}

.tooltip::before {
  opacity: 0;
}
This will style the tooltip so that it appears above the span element with the class “clicked” when the class is added to it and disappears when class is removed with the fadeout effect that takes 2 seconds.
You can adjust the duration of the transition by changing the value of the transition property.
Also, you can adjust the time to remove the class “clicked” accordingly.
The post How to make span element clickable and copy its contents to the clipboard? appeared first on Crunchify.


0 Commentaires